![]()
Confused on how to start your university architecture project? It’s no problem with this step-by-step guide on creating the perfect project!

1. Set-up your file system
Taking time now to fully set-up your file system for your university architecture project will save you soo much time and effort down the line. Do this now and you won’t need to be clicking through 10 files named “final_drawig001_realfinal05_FINALONE” at 2am on submission day.
First, get your file system in place. A master folder of the project with subfolders for site, research, hand drawings, physical models, CAD model, CAD drawings, visualisations, and final drawings. THE MOST IMPORTANT THING: DO NOT GET LAZY! Always name and organise your files as you go.

2. Set-up your master project file
Look up your submission requirements, and use it as a tick list. Create a master InDesign file with pages for all your requirements. Having everything in one place will help you see your project developing and allow you to create a narrative throughout the project.
Here, you can also choose your project’s aesthetic. Create a colour scheme, choose your fonts and layouts to form your own unique style that stays consistent throughout the portfolio.
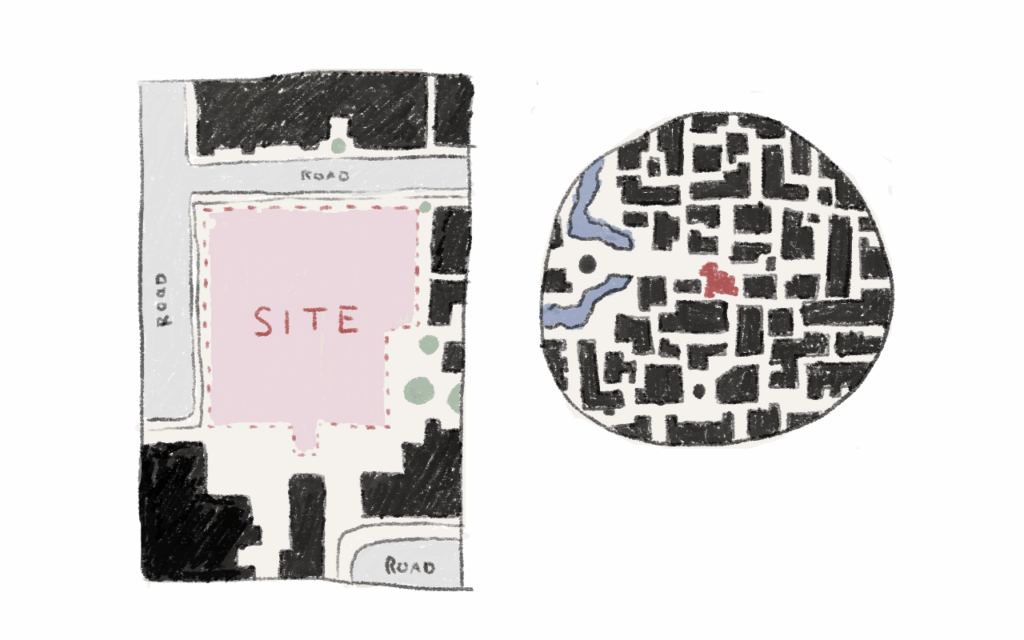
3. Site Plans
While thinking about your concept you can be doing the busy work of creating your site plans.
You’ll need a wider context map that shows the city or landscape you’re building in (around 1:1500 or 1:2500) to use for site analysis. You’ll also need a site map that you can use as a base layer to design on (around 1:200 or 1:500).

4. Client introduction
You may be given a client or you might have to make up your own. Create a page describing the needs and wants of this client. If it’s a bespoke design for one person you could create a daily routine timeline for them. If it’s for a collective, identify the spaces and activities they need to successfully function.
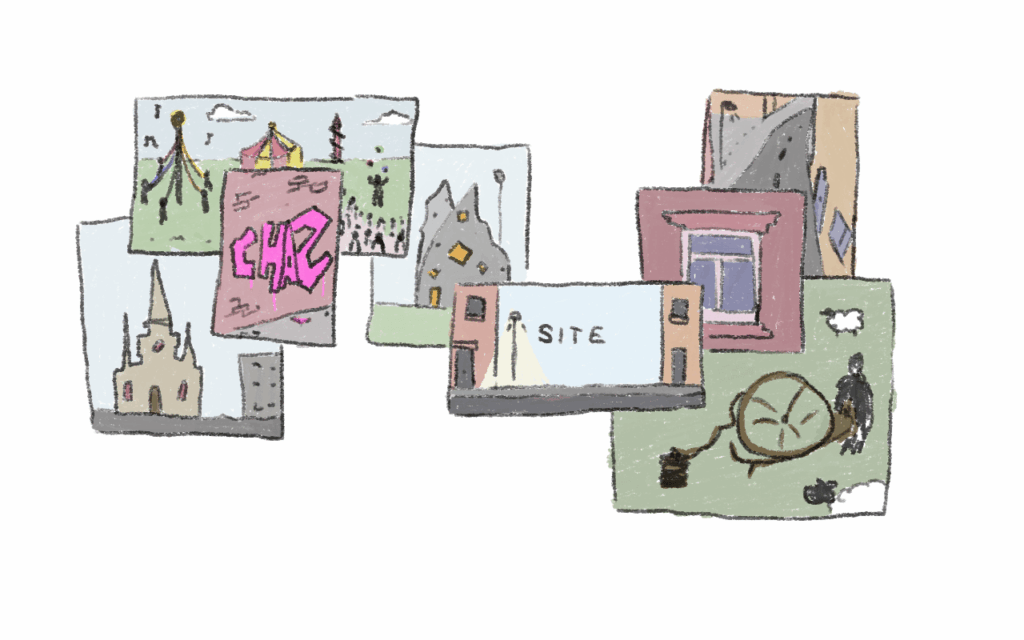
5. Site Photos
Going to location is very important. It will help you to understand the feeling of the area and the surrounding buildings. It also helps you see the culture and the people already living there. Photographing the site, surrounding buildings, and local culture will help you form a whole image of the site’s context.

6. Location Introduction
Using your site plans, photos, and research you can create a page introducing your site. Tell us where it is in the world, what’s it’s history, who is living there now and what makes it unique or interesting to you/your client. Is the area historically known for weaving or fishing? Is there a community that calls it home now with a fun local legend? Perhaps there’s a wall that is constantly being tagged with new graffiti? Link the site to your project and your interests, this will help you form a solid concept for your design.

7. Environmental analysis
The next couple pages will be environmental studies. You can take your wider context plan and overlay information on top such as: Sun path, wind direction, rain fall, flood risk zones, bodies of water, green spaces, sources of air/noise pollution. This info is to be used to inform your design. If there’s a flood plain you might want to introduce a water garden or stilts for example. If the sun path shows that your site is in complete shadow, you can make artificial lighting a key feature.

8. Anthropological analysis
Then we move on to the human side. Find out the local demographics, is it a lot of families or single and migratory. Colour each building on a plan to show if it’s residential, commercial, industry, or a public building (school, GP, hospital, council hall).
What are the routes to site? On a plan show primary and secondary roads. Then add the nearest the bus stops, walking paths to site, and car parks. You can also put rings of 10, 20, 30 minute walking distance to see how connected your site is to it’s surroundings.
You can highlight potential views or eyesores that would be seen from your building, and on the other side key points on streets in which people walking by can see your building and be drawn in.

9. Overview of constraints and opportunities
This is a good point to summarise all your research and explain which parts you’re planning on using for your design.

10. Concept introduction
This is where you start adding the narrative to your project. Hopefully you’ve found something while researching that sparks your interest. Document your initial sketches and ideas and explain what you’re hoping to achieve.

11. Case studies of similar concepts/design/site
Once you’ve got a concept start looking for existing projects that have similar elements to what you’re trying to achieve. If you want to build with unusual material, show a building that has utilised the material well. If you’re designing a church, show one that has inspired you. Anything that your design is doing differently, show that it has and can be done. Don’t worry this doesn’t show that you’re unoriginal, as none of the projects will share all the same elements as yours. It there to show that your ideas are well thought out and realistic, that you’re “in dialogue with the architectural discourse”.

12. Site Model with sketch models physical or digital
Depending on your mark scheme and personal way of working, your site model will be physical or digital. It’s best to start this as soon as you have your site plans as it always takes longer than you expect. Afterwards you can start making little test models that fit onto the site to try out your initial ideas.

13. Analysis and iterations of design
Start sketching on top of prints of your sketch models, show how you’re developing your initial ideas. Take your previous analysis and create more sketch models. Try taking key elements of your design and model them, see how they evolve.

14. Explain final design decisions with detail drawings
Now it’s time to finalise your design. Zoom into your favourite moments, ones that explain your project’s narrative. Create snapshots of construction details and stories that happen there.

15. Environmental design solutions implemented
Take your latest building sections and annotate them with your environmental decisions. Think how are you making the building sustainable? You can add green energy production or passive ventilation.

16. Building Floor plans
Each level of your design will need a floor plan. Remember to keep the drawing scale consistent on each plan, label each space, and to put the scale, title and north arrow in one of the corners.

17. Long section
The long section should cut through the longest length of the building. Try to cut through the elements that provide the most interesting views. In the corner there should be the title, scale, and a small plan of the building with a line showing where the section is cutting through.

18. Short section
The short section also known as the cross section, is a drawing of building cut through the shorter length of the building i.e. perpendicular to the long section. Even though its a smaller drawing keep it the same scale as the long section to help with readability. Again, put the title, scale, and key plan in the corner.

19. Four elevations
You should have drawings of the front, back, left, and right sides of your building. They should be all the same scale and can you guess what I’m going to say? Check you’ve put the title, scale, and key plan in one of the corners of the page.

20. Perspective Views
These are the fun drawings where you can show off the interesting features of your building. They are most often 3D rendered images or collages nowadays but hand drawn is always admired. I would aim for at least two, one internal the other external, but more showcasing key concepts of your design would be desirable.

21. Go celebrate!
After doing all of this, pat your self on the back and go party! You have an amazing well thought through university architecture project to celebrate 🙂

Subscribe to the newsletter to receive a free printable checklist for your university architecture project!
Thank you for reading!
I hope you now feel more confident in how to make your university architecture project. Comment down below any questions or tips 🙂


[…] pin-up speeches will help you identify where your story gets lost or goes in circles. In addition, this article will help you identify what pages are […]
eeeee ty! I’ve been super stressed about my project this year and this helps so much <3 can you explain the concept intro more, thats what always gets me stuck
I’ll definitely make a tutorial on concept introductions soon, my article on narrative building https://thebuiltword.com/how-to-add-narrative-to-your-architecture-project/ might be helpful in the meantime?